Biographical Information
This is the information that appears at the top of and in the sidebar of your profile. Besides your actual iD, this is likely the first information someone will see when they get to your profile.- Names
Names
Click the pencil icon beside Names to edit.
Your ORCID record shows three types of names:- Your given and family names: this is the first and last name you would like others to refer to you as. This is the only mandatory name field.
- Your published name: If you publish or have published under a different name than the one you listed above, enter that name here. An example of this might be “Jane Doe” (given and family name) versus "Jane R. Doe" (published name).
- Also known as: This field is for a researcher who goes by multiple names, who occasionally uses their middle name, who has changed their name, whose name is spelled differently in different languages, or who might be known by other names for any other reason. You may add as many other names as you wish by clicking the + Add other name button; you can reorder names in this section by holding and dragging the six gray dots beside each name.
- Biography
Biography
You have the option to write a brief biography, which sits at the top of your ORCID profile.
Click the pencil icon beside Biography to edit.
- Countries
Countries
Add countries or locations where you conduct research, where your research is focused, and/or where your institution is located. Add as many countries as necessary – you may add and delete countries as you see fit.
Click the pencil icon beside Countries to edit.
Visibility is set at the individual level, meaning that you can control the visibility settings of each country or location you list. You may reorder countries and locations by holding and dragging the six gray dots beside each name.- Emails
Emails
You can easily add and remove email accounts on your ORCID record and may have as many email accounts linked to your record as you like. This is useful if you change institutions, if you are affiliated with multiple institutions, and/or if you would like to have a personal email linked to your record for backup.
Click the pencil icon beside Emails to edit.
Visibility is set at the individual level in this section, meaning that you can control the visibility setting of each address that is linked to your account. It is highly recommended that you make your UWindsor email address visible to everyone.
Here, you also determine which email ORCID will send notifications to.
TIP: ORCID will assign a Trust marker (a green check mark) to your UWindsor email domain if you have verified it AND set its visibility to Everyone. This allows you to demonstrate your association with an institution in a way that also preserves your privacy. ORCID will only add this marker for institutional emails (not personal ones). For more information, please see ORCID's blog post on this topic.- Websites and social links
Websites & social links
Add links to personal websites, department profiles, Wikipedia pages, or social media accounts.
It is especially recommended that you add links to any other researcher identifiers you have (e.g. Google Scholar Profile, Web of Science ResearcherID, etc.). If you authorize the connection between your ORCID and your Scopus Author ID (see Adding Works section later in this guide), it will automatically appear here as well.
Click the pencil icon beside Websites & social links to edit.
Visibility is set at the individual level, meaning that you can control the visibility setting of each website/link. You may reorder links by holding and dragging the six gray dots beside each name.- Keywords
Keywords
Enter keywords that best describe your scholarly activities so that others may find you when searching the ORCID registry. You may add as many as you like keywords and can easily add and delete them as you see fit.
Click the pencil icon beside Keywords to edit.
Visibility is set at the individual level, meaning that you can control the visibility setting of each keyword. You may reorder keywords in this section by holding and dragging the six gray dots beside each name.
Activities
These describe your professional activities, and are where most of the content of your profile is located. Works are a type of Activity as well, but they have been given their own section in this guide (below).- Employment
Employment
Trusted organizations can add and update your employment affiliation to your ORCID record. You may also add your employment information manually by completing the following steps:
- Under the Employment heading, Click +Add.
- Fill in as many of the fields as you can, ensuring that you, at a minimum, complete the required fields (denoted with a red asterisk).
- TIP: University of Windsor will appear as you type. Once it does, click it from the dropdown list.
- Set your preferred visibility setting. It is highly recommended that you set the visibility of your UWindsor employment affiliation to Everyone.
- Click Save changes. You may edit any entry you’ve manually created, at any time, by clicking the pencil icon on said entry. You may also delete it by clicking the trash icon.
- Education and Qualifications
Education and Qualifications
Trusted organizations and trusted individuals can add your education (where you have studied) and qualifications (organizations that have awarded you an educational or professional qualification) to your ORCID profile. You may also add your employment information manually, by completing the following steps:
- Under the Education and qualifications heading, Click +Add.
- Select Add Education or Add qualification.
- Fill in as many of the fields as possible, ensuring that you, at a minimum, complete the required fields (denoted with a red asterisk).
- Set your preferred visibility setting.
- Click Save changes.
- Professional Activities
Professional Activities
There are four types of Professional activities in ORCID:
- Invited Position – a formal relationship outside of employment between you and an organization.
- Distinction – an award or honorary degree.
- Membership – being part of an organization.
- Service – your donation of time or other resources to/for an organization.
Trusted organizations can add and update your professional activities on your ORCID record. You may also add your professional activity information manually, by completing the following steps:
- Under the Professional activities heading, click +Add.
- Select the appropriate activity.
- Fill in as many of the fields as possible, ensuring that you, at a minimum, complete the required fields (denoted with a red asterisk).
- Set your preferred visibility setting.
- Click Save changes.
- Funding
Funding
Trusted organizations can add and update information about your grants, awards, and other types of funding to your ORCID record. You may also add your funding information yourself, either using the Search & link feature or manually. Start by clicking +Add under the Funding heading and select either Search & link or Add manually.
Search & link
Allowing the Search & link wizard to add your information to your profile saves you time over updating your record manually. To add funding to your profile through this option:- Click DimensionsWizard.
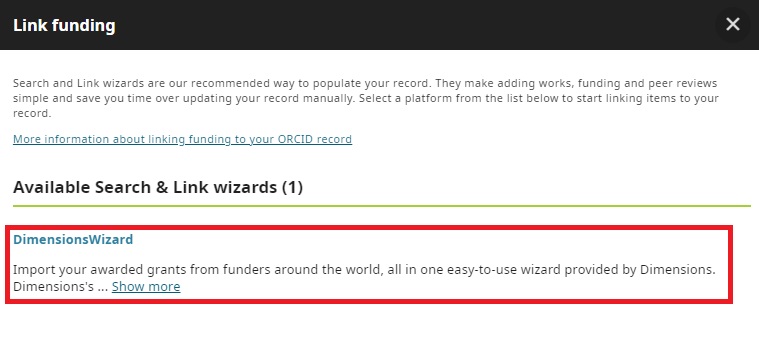
- Click Authorize access to allow the DimensionsWizard to search for and pull in your funding information.
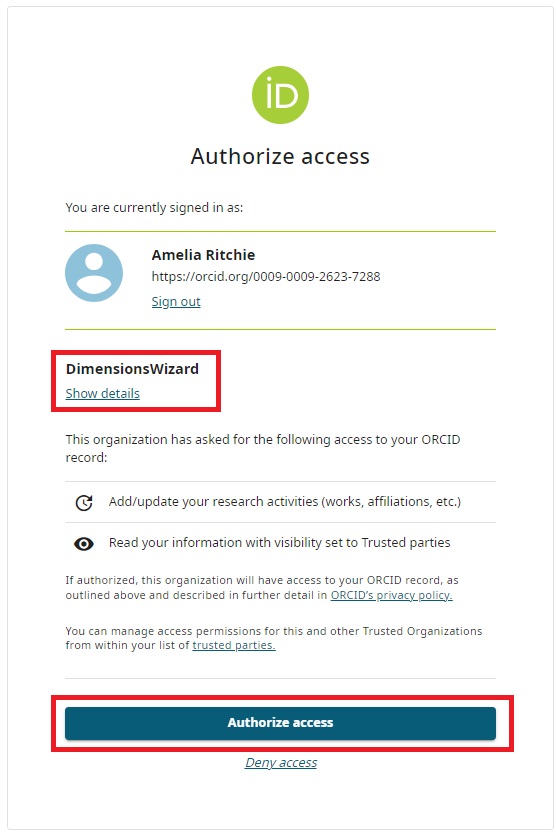
- You will be taken to the Dimensions website, where you can search for your funding information, which the Wizard will link to your ORCID record.
Add manually
To add funding information to your profile manually:
- Fill in as many of the fields as you can, ensuring that you, at a minimum, complete the required fields (denoted with a red asterisk).
- TIP: Each entry should correspond to one funding award. If a single project was funded by multiple awards, enter each award separately.
- Click Save changes.
You may edit any entry you’ve manually created, at any time, by clicking the pencil icon on said entry. You may also delete it by clicking the trash icon.
Activities - Works
This is one of the most valuable sections to have fully updated on your ORCID profile. Your works include your publications, data sets, conference presentations, and more. Please see this blog post for a full list of work types currently supported in ORCID*.Trusted organizations and individuals can add your works to your ORCID profile for you, or you may add this information yourself in a variety of ways. Start adding your works information by scrolling to the Works heading in your profile and clicking +Add.
NOTE: ORCID does not store full texts of your works – rather, it shows the metadata of that work with a link to the source.
*NOTE: ORCID recognizes that many work types important in humanities and arts disciplines have not been not well represented in the ORCID registry, and has worked to address this.
- Search & link
Using the Search & link tool, you can import information about your publications and other works from several organizations who have linked themselves to ORCID. These organizations include, for example, DataCite, MLA International Bibliography, and Scopus - Elsevier. For a full list of search & link wizards, visit ORCID’s Help Guide.
- In the +Add dropdown, select Search & link.
- Click the database from which you would like to pull publication information into your ORCID profile.
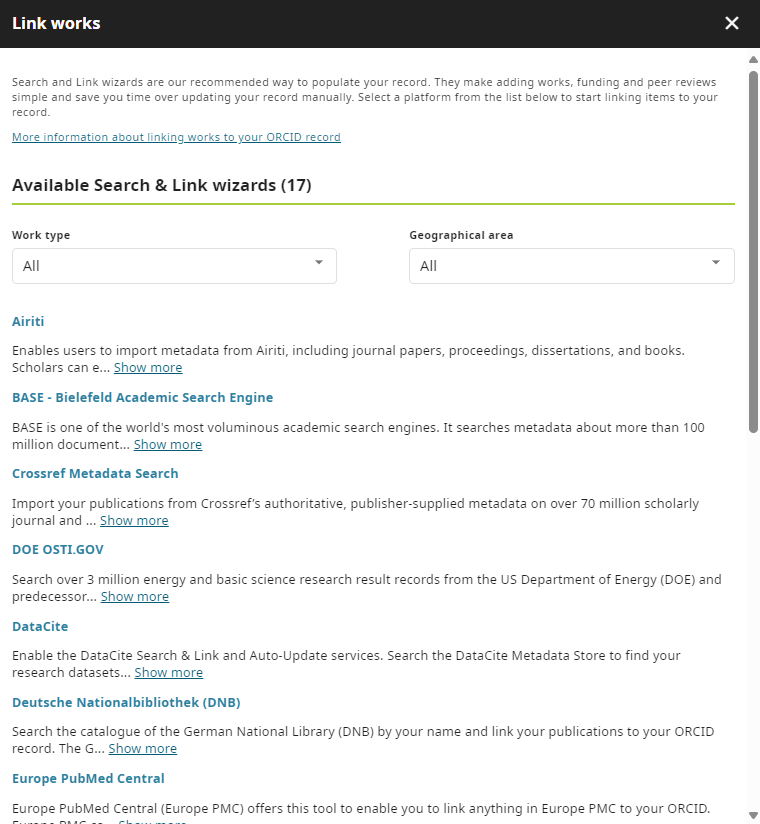
- Authorize the database to add works to your record.
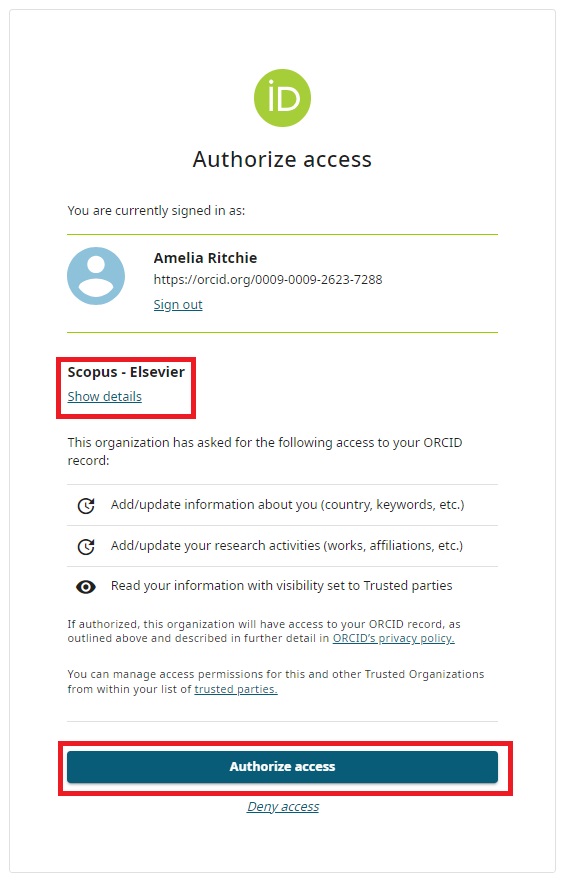
- You will be redirected externally to the database’s search & link tool. Follow the necessary steps in that tool to bring your information into your ORCID profile.
- TIP: Each Search & link tool has its own steps for bringing this information over. If you would like assistance with any of these tools, please reach out to us at scholarship@uwindsor.ca and we’d be happy to help.
- After you complete all the necessary steps in the external tool, return to your ORCID profile. Refresh the page, and your work will now appear on your profile. The Source (at the bottom of each record) will state “[Your Name] via [the database you used]".
- Add DOI
Add DOI
To add a work via DOI:
- In the +Add dropdown, select Add DOI.
- Enter your publication’s DOI (either just the identifier value or the full URL) and click Retrieve work details from DOI.
- Review the Work details, fixing any mistakes and/or adding any missing information.
- Click Add this work to your ORCID record.
- Your work will now appear on your profile.
- Add PubMed ID
Add PubMed ID
This option is suitable for biomedical work citations that are available in the PubMed database. To add a work via PubMed ID:
- In the +Add dropdown, select Add PubMed ID.
- Enter your publication’s PubMed ID (either just the identifier value or the full URL) and click Retrieve work details from PubMed.
- Review the Work details, fixing any mistakes and/or adding any missing information.
- Click Add this work to your ORCID record.
- Add BibTex
Add BibTex
This option is suitable if you have access to a BibTex file containing information about your works. If your works are listed on your Google Scholar Profile, you will be able to download its metadata as a BibTex file. See Google Scholar Profiles’ quick explanation on how to do this. Once you have the BibTex file ready to go:
- In the +Add dropdown, select Add BibTex.
- Click Choose BibText file to import.
- From the list that appears, select the works you would like to import and click Import work to your record at the bottom of the page.
- The works should now appear on your profile.
For more information, please see ORCID’s Help Guide.
- Add manually
Add manually
- In the +Add dropdown, select Add manually.
- Fill in as many of the fields as you can, ensuring that you, at a minimum, complete the required fields (denoted with a red asterisk).
- TIP: It is strongly recommended that you add a Link to the work so that others can access the full text. Another good field to ensure you have completed is Contributors to this work. Add your co-authors by clicking +Add another contributor.
- Click Save changes.
- Other
Merging duplicates
This feature can be used to combine the record of your preprint on your ORCID profile with the version of record (once it is published), setting the version of record as the preferred source. It can also be used to combine versions of a singular work from multiple Search & link wizards together.
To merge duplicates:- Underneath the Works heading, click Manage similar works.
- ORCID will present you with works the system has deemed as being the same. Check each work to ensure it is fact the same, then click Combine selected works.

OR
- Select the works you would like to combine by clicking the box beside each.
- Under the Works heading, click Actions --> Combine works.
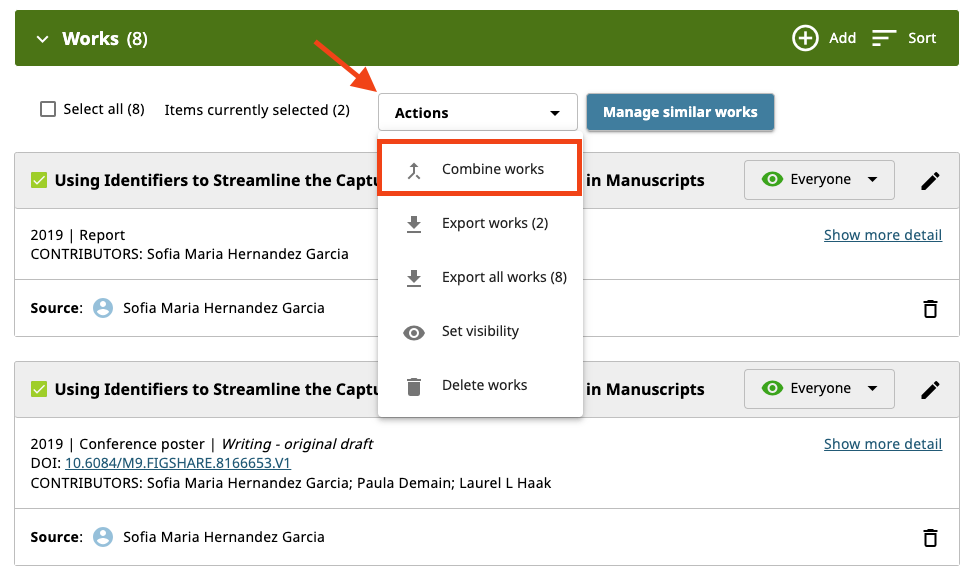
When works are combined, one will be set as the Preferred source. This is the record that will show on your ORCID record. To access the other versions, a user will need to click on the "(of #)" on the record. Ensure that the appropriate version of the record is set as the preferred source (for example, ensure the version of record of an article is the preferred source, as opposed to the preprint or postprint.

For more information, please see ORCID’s Help Guide.
Useful information
- The visibility of your works will automatically follow the default you have set for your profile. You can set the visibility of each of your works individually by clicking the dropdown on the work.
- Use the pencil icon to edit each work, or the trash icon to delete it.
- Use the Actions dropdown to perform selected functions for a group of your works
Information that can only be added by trusted parties
There are two types of trusted parties in ORCID: Trusted organizations and trusted individuals. A list of trusted parties on your account can be found by clicking your name/the Profile icon at the top right of your screen, and clicking Trusted parties from the dropdown.- Trusted organizations are organizations or systems to which you have granted access to interact with your ORCID. These include, for example, the DimensionsWizard (from the Funding section), Scopus (from the Works section), and Crossref (from the auto-updates section).
- Trusted individuals are other ORCID users to whom you have granted permission to update your ORCID record for you. To allow another account to update your ORCID profile for you, type their associated iD, email address, or name into the search bar and click Search ORCID for trusted individuals. When the pop-up box appears, click Add as trusted individual.
- NOTE: If someone has made you a trusted individual on their account – allowing you to update their profile for them – you will see them listed under Users that trust you. For more information on this, please see ORCID’s Help Guide.
Some information can only be added to your profile by Trusted organizations:
- Peer review
Peer review
This section of your profile pertains to your individual peer review contributions, and information can only be added to it by a trusted organization. You may not add entries to this section yourself. To learn how to add information about serving as peer reviewer for a journal, conference, faculty, et cetera, refer to the Professional activities section of this guide.
During the peer review workflow process, the organization for which you are carrying out the peer review will request your ORCID iD and ask for your explicit permission to add this information to your profile. It is only with your explicit permission that they can add this information to your record.
For more information, please refer to ORCID’s Help Guide.- Research resources
Research resources
This section of your profile pertains to the specialist resources that you use to conduct your research, which can include infrastructure, collections, equipment, and services. Identifying this on your ORCID record helps increase transparency and improve research rigor and reporting. Information may only be added to this section by a trusted individual; you may not add entries to this section yourself.
During the application process, the organization that is providing the research resources will request your ORCID iD and ask for your explicit permission to add this information to your profile. It is only with your explicit permission that they can add this information to your record.
For more information, please refer to ORCID’s Help Guide.- Person identifiers
Person identifiers
This section of your profile pertains to other researcher identifiers that you might be connected to or identified with. Some identifiers are added to your bibliographic information when you connect to systems using Search & link wizards. One example of these is your Scopus AuthorID. Other identifiers are added when you connect those identifiers to a system that is already connected to your ORCID iD. Your ResearcherID is an example of this type.
For more information, please refer to ORCID’s Help Guide.
Automatic updates
In ORCID, you have the option to allow Web of Science, DataCite, and Crossref to automatically update your profile whenever they receive new information attached to your ORCID iD. To learn more about granting auto-update permissions to each of these systems, go to ORCID’s Help Guides at the following links:- Web of Science
- DataCite
- Crossref
- TIP: Granting access to Crossref Metadata Search in the Works Search & link Wizard is not the same as granting access to Crossref, which will auto-update your profile. These are two separate systems, and each interacts with ORCID separately.


Connect with your library